Change Remote Desktop Gateway Port and Remote Web App Port


The default Remote Desktop (RD) Gateway encapsulates RDP in HTTPS packets listens on port 443 (for TCP) and port 3391 (for UDP). Many times you are limited to one public IP address and the port 443 is already occupied by some other service.

In that case you should change the port 443 to something else. Bellow is the procedure of doing it:

Open  Remote Desktop Gateway Manager (Start > Administrative Tools > Remote Desktop Services):

  1. Right-click the Remote Desktop Gateway server name and select Properties.
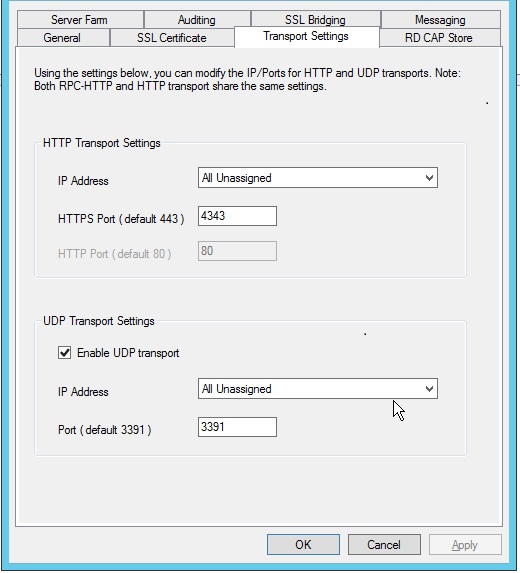
  2. Select the Transport Settings tab.
  3. Modify the HTTP and/or UDP port number and click OK.


2016_04_20_15_45_27_MAIL.MATJAZ.SI_2014_Remote_Desktop_Connection

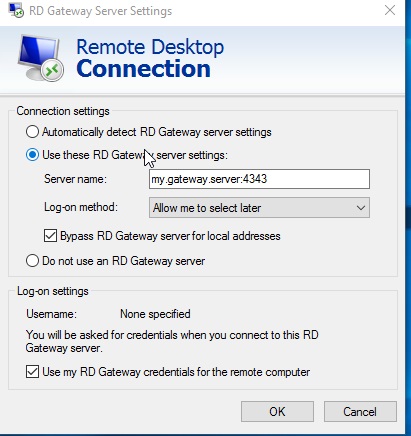
Now, when accessing with the RDP client you have to specify the RD Gateway server name with the custom port  you have to specified before.

2016_04_20_15_59_13_


In case you are using also published Remote Web Apps you have to use a powershell trick to change the TCP port to your custom.  Remote Desktop Gateway Port. On your RD Connection Broker use powershell commands below to change the published gateway to include your custom port:

Import-Module RemoteDesktop

Set-RDSessionCollectionConfiguration -CollectionName “MySessionCollection” -CustomRdpProperty “gatewayhostname:s:my.gateway.server:4343”


Windows Server Remote Desktop Services grace period expoired

Remove the RDS licensing time-bomb registry entry with the help of Sysinternals PSExec (Regedit alone couldn’t do it because it had to be run under highest privileges):

psexec -s -i regedit.exe:

Locate the registry key: HKLM\system\CurrentControlSet\Control\Terminal Server\RCM\GracePeriod


Remove the registry key GracePeriod and reboot the computer.

Remotely enable Remote Desktop in Windows 7/8/8.1

Step 1: Open ports in the Windows firewall

There is no native way to change the settings of a remote Windows firewall. However, you can use PsExec from SysInternals to disable it or change some rules.

If you download the app and drop it into your c:\ drive, you can run this command and get command line access for that remote box.

c:\psexec \\remote_machine_name cmd

Once you have that command line open, you can run this command to disable the firewall:

netsh advfirewall set currentprofile state off

Alternatively you can run this command to allow only Remote Desktop while still leaving the rest of the firewall as is:

netsh advfirewall firewall set rule group=”remote desktop” new enable=Yes

Step 2: Start the Remote Registry service

Load up the Services MMC (Control Panel > Administrative Tools > Services), right click on “Services (Local)” and choose “Connect to another computer”. Enter the name of your remote machine and connect to it. You should now be able to find the “Remote Registry” service and start it.

Depending on your environment, this may already be running, but I have found it generally isn’t on fresh computers.

Step 3: Change a registry setting to enable Remote Desktop

It’s time to make use of the Remote Registry and actually enable RDP. Load up regedit and go to File > Connect Network Registry. Enter the name of your remote computer and connect to it. Navigate to HKEY_LOCAL_MACHINE > System > CurrentControlSet > Control > Terminal Server. Change the value of “fDenyTSConnections” to “0”.

Step 4: Start the Remote Desktop service

Go back to the Services MMC you used in Step 2. Find the service “Remote Desktop Services” and start it (or restart if it is already running).

Step 5: Connect

By this point you should be able to connect to a remote desktop session on your remote computer. Remember that only administrative users can connect to an out-of-the-box Remote Desktop setup. If you have got this far and still can’t connect, it is worth checking your firewall rules to ensure nothing is being blocked.


Taken from: http://mediarealm.com.au/articles/2013/03/remotely-enable-remote-desktop-in-windows-7/

Force-removing the RDS licensing time-bomb

Force-removing the RDS licensing time-bomb registry entry:

HKLM\system\CurrentControlSet\Control\Terminal Server\RCM\GracePeriod

RegEdit alone couldn’t do it. It had to actually be run under highest privileges with the help of Sysinternals: psexec -s -i regedit.exe

After another reboot things seem to be working now.